Categories

add blog login

Follow on Bloglovin
Showing posts with label DIY. Show all posts

Tuesday, 17 March 2015

Returning To My Sewing Machine


 After being in a massive knitting rut and a lull in Etsy and Folksy sales I thought of taking a little holiday from advertising and making things solely to sell. I was starting to not enjoy what I was making which no crafter should ever experience!

I lasted the total of 3 hours on my day of without creating anything and then cracked the sewing machine out to finish the sofa cover (its not knitting so it doesn't count!). It wasn't perfect but it turned out really well!
Extremely bad photo and messy living room but you get the picture!
I haven't sewn anything since uni which was now 2 years ago, time goes so fast! But I remembered a couple of Burda patterns and fabric I had bought before christmas to make for spring. I want to start wearing all of my own makes so I bought a shirt pattern and basic dress and jacket pattern.
Three different blouse patterns smart, work and casual!
So last night I decided I wanted to make the tux style shirt, but with the regular cuffs so it is still wearable. I traced the pattern and and cut my fabric out in record time. Now to the sewing! I started the pleats for the front panels and lasted a total of 20 minutes before I realised I had cocked it up already! My pleating effort resulted in this:
What even is this?
Look how uneven and wonky those pleats are. I obviously got over excited so I turned to the instructions for help. After all I followed the pattern pleat and sew lines so I must have gotten confused. That is where I found the downside to this pattern, there is no explanation about the pleats and I still don't know what I did wrong, considering the panel ended up an inch out! 

I went and stared at my yarns for a bit, I find this tends to calm me down and give me ideas, mental I know but it works for me. And then I thought I need to take this into control and the only way I know how to get my pleats with mathematical precision would be with knitted pleats! I cant help myself. So I chose a white viscose 2ply with some clear lurex and knitted a pleated panel.

Much Better!
You can't see the lurex much in this photo because It is very subtle. I wasn't too worried with it being sheer because I had cut out 2 cotton panels to back the knit with so it could sit on the shirt front flush without pulling or distorting. 

I made the front panels by sewing the cut out shapes on the wrong side of my knitted pleats then cutting out the panels, this ensures you don't get a huge ladder and that the shape is correct. Cutting out knit is a nightmare without backing. You could also use bondaweb but you can sometimes see it under the knit and it can make your fabric a bit too crisp. 

I have set them into the fronts and they look great! So far so good and a good mornings sewing before work. It did only take me another 10 minutes to go wrong again but I might change the design to regular button stand rather than concealed just to make my life easier. As I will wear this shirt for every day rather than the black tie its intended for. 

But thats tomorrows problem!


Wednesday, 30 July 2014

Experimenting With Upcycling

As you know from my older posts I have recently moved and what this has made me realise is that I own way too many clothes! I used to make a decent amount of money whilst I was a student buying from charity shops and jumble sales and then re-selling on Ebay. Of course this means that you get left over with a load of unwanted clothing. So i was sorting through trying to cram it all in my little studio when I found a grey jersey maxi dress I used to wear but for some reason just abandoned it. I started thinking and came to the conclusion that I could incorporate my goal of using up my oddments of yarn and create new products for my shop quickly and easily!

So I started simple and cut along the waist seam instantly creating a crop top, it was then I decided to make a grey and yellow colour scheme. I took a ball of yellow cotton yarn I think I bought about 3 years ago and did a cute little blanket stitch around the hem. This covered any bad patches in my cutting and added something a little special I think.


Then out of the skirt of the maxi dress I tried my hand at making t-shirt yarn, I found an awesome illustrated tutorial by FUCK YEAH CRAFT! a blogger and Huddersfield crafter and got cracking with my own t-shirt yarn. It only took about 20 minutes to have a ball of yarn ready to use. I started by crocheting a waist band and hem then knitting a marl of some remnant yarn I had that was a really weird mix but I think it looks good. I ended up using a grey wool then yellow silk and kevlar. The knit forms 2 panels front and back and comes together at the seams to create tassels. Then a quick i-cord to make a drawstring waist.


So I had my outfit I just needed a little extra, so I carried on with the i-cord and made a cool multi stranded necklace that I think really finishes the outfit off. All three pieces I made for this item last week are now available from Etsy and Folksy. I think It definitely worked out a success! Let me know what you think.


Buy this on Etsy:  https://www.etsy.com/uk/shop/GraceCookKnitwear?ref=si_shop

Buy this on Folksy: https://folksy.com/shops/GraceKnitwear


Wednesday, 12 February 2014

Double Point Needle Socks Challenge

So my fiancee is making a massive point that his beloved slipper socks have two massive holes in. I'm sure he either wants me to darn the holes on them or knit him new ones. Especially since I have finally learnt how to knit socks on the machine (shouldn't have told him!) As it's valentines this friday I'm setting myself a challenge to learn double pointed needles and knit him a nice pair of slipper socks! I realise how mad that sounds but I'm learning on quite big needles and with a 4 ply yarn rather than a sock weight. So If it doesn't work I can still jump on the machine and knit some quickly haha! So here are the needles and yarns I'm using and this is the printable basic DPN sock pattern from cometosilver.


Free Printable Valentines "I Love You More Than Knitting"

I thought I would just sit down and illustrate a little valentines card for my other half for valentines this friday. This is my "I love you more than knitting" free printable valentines card or and e-card. Just right click and download or print!

Tuesday, 11 February 2014

Today I'm Ill… Hand knitting

So I keep meaning to get more familiar with hand knitting, since I spend a lot of my time on public transport/stuck in places with nothing to do and always wish I could crochet and hand knit better so I can actually be productive in the hour it takes me to get to work which is silly. Also I have loads of hand knitting weight yarns and need to put them to good use before I move out. So today I have been using a chocolate brown super chunky weight yarn I bought from John Lewis about 2 years ago, I initially bought it because it had a broken label and was reduced from like £5 to £2.50 so I thought why not! Unfortunately I don't know what brand it is but it's been lovely to use and really makes plain knit stitches look defined and interesting. I'm making a chunky snood since the weather is going to be cold for a while and I'm going to Scarborough next week for my birthday so I'm going to want some nice warm accessories to warm up my leather jacket. So here it is, I've been sat in bed ill today so I thought I would seize the chance to knit. (No judging allowed from you hand knitters)


Thursday, 6 February 2014

How To Quick Knit Socks

This is a quick tutorial on how to knit a quick pair of socks, I know most people will want to hand knit them with circular knitting needles but if I tried that they would never be finished. These take me about an hour from casting on the sewing in the ends. I use a knitting machine because thats my style but you could easily use this pattern hand knitting as long as you understand shaping and short row.
 I started with a soft wool and some matching grey elastic, the elastic is obviously optional as you can just sew a little in after knitting or rely solely on the ribbing to hold the sock up. Personally I find knitting it in is a nicer finish because I'm crap at hand sewing!
 I cast on using a mock 2x1 rib using from 30 to 30 and knit 20 rows. You can pick up the dropped stitches to make a true rib or use a double bed machine or hand knit it but I find this technique works and looks just fine plus is quickest for me.
 Bring all your needles forward and do 40 rows of plain knitting.
 Select hold and bring forward half the needles opposite to the carriage. This is when you turn the heel, which I'm hoping you already know because it is hard to explain! You bring one needle forward at a time opposite to the carriage for each row. You need to wrap the needle on the carriage side each time to prevent getting holes in the heel.
 This is a picture of the needles fully out and you should be able to see how each needle is wrapped this is to stop the holes. It is really important to weight your work whilst turning the heel or doing any short row technique else it will fall off! You now bring each needle back into working position for every row on the side opposite to the carriage each time.
 You should now be able to see your heel shape make sure to keep that side more weighted than the other because it now has more fabric to weigh down.
 Do another 40 rows in plain knitting before we get to the turning of the toe. This next part is optional the reason I turn toe even though there is a seam is so that the seam is on top of the toe and therefore will not irritate the wearer as much as if the seam was under or in line with the toes.
 Cast off half the stitches in the plain side of the sock this is the top of the sock.
 With the remaining needles do the same technique as with the heel but only go in 5 needles each side and back again. Once finished do not knit any more just cast off.
 This is the finished sock shape before being pressed.
 Excuse the gross legs! These are the finished socks after being sewn along the toe and the side seam. You knit the second sock exactly the same but the opposite way round to have the seams facing inward.
 I use a Hague Linker to sew all my clothing and items up I feel it is quicker and gives a more professional seam. It is barely visible on this sock!

SO there you go! A quick and well fitted sock pattern that can be done in all sorts of yarns and colours either on the machine or by hand knitting. Taking just an hour you can make a pair of socks for each day of the week!

Thursday, 24 October 2013

First Knitting Project

Okay so the title isn't true, this isn't my first knitting project but it is the first project I have done for myself. Which is strange really, all of the crazy complex knitting I have done on my machine I have never completed anything for myself. But now I feel like I have gotten over the whole "knitting is work" thing, I do love knitting but after such a stressful course I had this weird mentality that connected knitting to working! So anyway after I bought the new Kid silk yarn I wanted to give it a test run without wasting any of my new stuff! So i took my Rowan ball that I had left and got it machine ready.

 Now I know why they don't selly them like this! Looks like a fluffy legoman head.
 So the mohair was hard work but I got used to it eventually!
 I marled the mohair in with a light grey acrylic, a wool and nylon  yarn and a dark grey aran yarn.
 I joined the cast on to the last row of knitting I did and cast off to make an infinity scarf. This is the finished article! I love of it feels and how it looks when worn.
I'm definitely going to start knitting things for myself, especially with all this yarn I've acquired! 

Monday, 9 September 2013

Beetlejuice

So the Primark falsies worked really well! They have been on now for 5 days straight and haven't budged! 2 days ago I had to go to a job interview at Fat Face and i didn't think the pop art nails were that appropriate so i painted them over in one of my favourite models own polishes in Beetlejuice. This is an amazing two tone polish that makes your nail elegant and fun.

Sunday, 8 September 2013

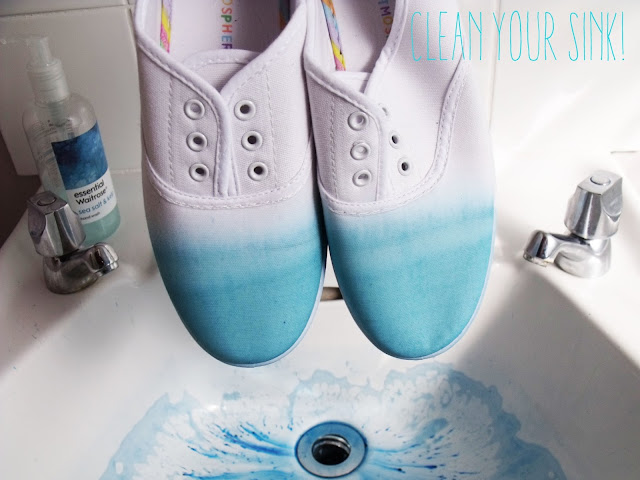
DIY Ombre Trainers

This is my fave DIY so far! It's a bit messy as it involves dye but the effects are really awesome. This DIY cost me a total of £5.50, the plimsolls were £3.50 from Primark and the dye was £2 delivered off Ebay.The rest I already had. You will need:
-White trainers
-Fabric dye
-Vaseline
-An old cloth
-Bleach(optional)

 1.
Take the laces out of the shoe, i think this makes the ombre pop a bit more when the laces are put back in, but it is up to you.

2.
Stop the sole being dyed with vaseline.

3.
DO NOT USE THE SINK IF YOURS HAS A CRACK OR DAMAGE!!!! As it will stain your sink, probably better to use a plastic washing up bowl. I use my sink all the time for dying and it is fine but i do not want other people to ruin their bathrooms!

4.
Dip your shoes in a third of the way and hold them there, wait about 3-5mins for the dye to soak up.

5.

6.
Use a wet (old) cloth to bring the dye further down the shoe, keep doing this until it is totally blended.

7.
If you have made any mistakes you can take some diluted bleach and rub over the mistake. This is optional as I know a lot of people hate bleach and if you are sensitive wear rubber gloves as bleach is a skin irritant.

8.
Leave to dry and re-lace your shoes.
Wear with pride!


Saturday, 7 September 2013

DIY Contrast Pocket Tee

Easy DIY using the scraps from the last 2 tank projects. For this diy you will need:
-Tee
-scrap fabric
-scissors
-needle and thread

1.

2.

3.


Hope you liked this DIY, it is a super simple way to make  a t-shirt that little bit more personal/special.

I hope you enjoyed this series of DIY's using one tank top to customise or make 3 different things. Stay tuned to see more DIYs!